

How To Remove Flexispy From Android
Install FlexiSPY on Non-Rooted Android
Before YOU START
- Cheque OS compatibility hither.
- Exist sure y'all have whatever passwords necessary to access the phone later on a restart.
- Installation steps may vary depending on device.
Select your device
-
Disable Security Settings
Open Play Store and tap the Profile icon

Tap Play Protect
Tap Settings at the top right
Turn OFF the below options
- Scan apps with Play Protect
- Ameliorate harmful app detection

-
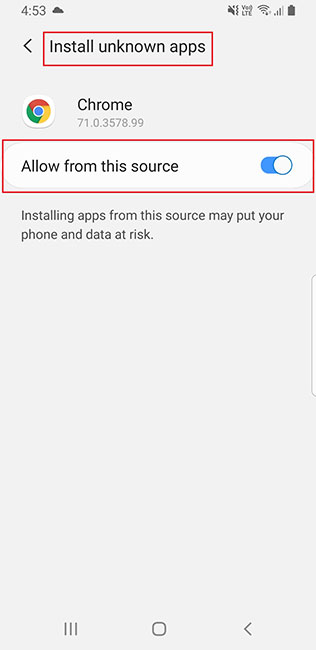
Enable Unknown Sources
Go to Apps > Settings > Lock Screen & Security and make sure Unknown Sources is enabled.
For Android OS 8 and above, get to Settings, search for Install unknown apps and tap on the browser that you volition be using for download software. For instance: if yous are using Chrome for download, tap Chrome and enable Permit from this source.

-
Enable Unknown Sources
Go to Apps > Settings > Lock Screen & Security and make sure Unknown Sources is enabled.
For Android OS viii and in a higher place, go to Settings, search for Install unknown apps and tap on the browser that you will be using for download software. For case: if y'all are using Chrome for download, tap Chrome and enable Allow from this source.
-
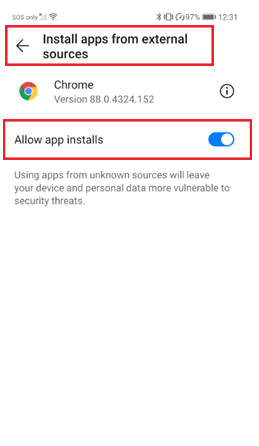
Enable Unknown Sources
Become to Settings > Advanced settings > Security and make certain Unknown Sources is enabled.
For Android Bone viii and in a higher place, get to Settings > security > more settings > install apps from external sources and tap on the browser that you will exist using for download software. For instance: if you are using Chrome for download, tap Chrome and enable Allow from this source.
-
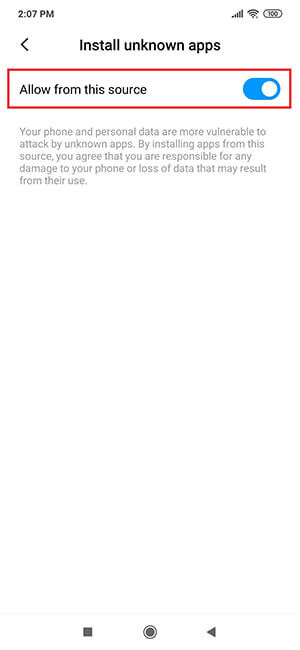
Enable Unknown Sources
For Android OS 8 and higher up, go to Settings, search for Install unknown apps > Select browser > Tab on Install unknown apps > enable Let from this source.
For example: if you are using Chrome for download, tap Chrome and enable Allow from this source.
-
Disable Device Security (Samsung devices only, Android OS seven and above)
For Android Bone 11 devices and above Go to Settings > Apps, and so tab Device intendance > Storage > Manage Storage > Clear data
For Android Os vii-x devices Go to Settings > Apps, tap
 (three dot icon on the peak right), then tap Testify organization apps > Device security > Storage > Clear data > Delete/ OK
-
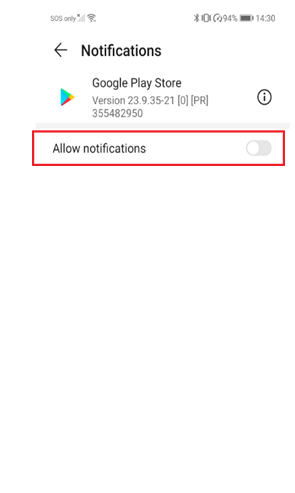
Disable Google Play Store Notifications
This is to avoid warnings which may otherwise randomly appear. Disabling Notifications does non disable Play Store or forestall normal app updates.
For Android Bone 9 and above: Go to Settings > Notifications (click "see all") > Google Play Store, and tap the slider to disable it. Tap on Google Play Store to open up the card and ostend Notification are disabled.
For Android Bone 8 and below: Get to Settings > Apps & Notifications > Notifications (scroll downwardly to Google Play Store), and tap the slider and so it reads "Off".
Of import Note
Some devices may have slightly different navigation to the Notifications menu.
-
Disable Google Play Store Notifications
This is to avert warnings which may otherwise randomly announced. Disabling Notifications does not disable Play Store or prevent normal app updates.
For Android OS eight and above: Go to Settings > Apps > Tap Apps (scroll down to Google Play Store) > Notifications, and tap the slider so it reads "Off".
Important Annotation
Some devices may have slightly dissimilar navigation to the Notifications card.
-
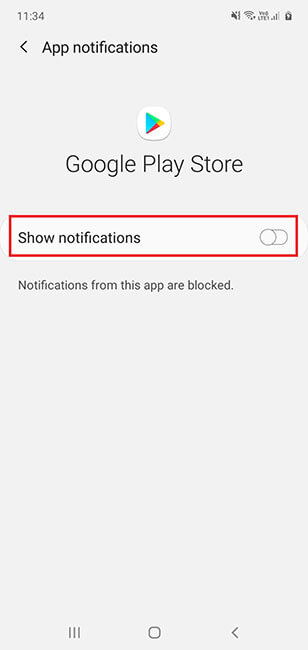
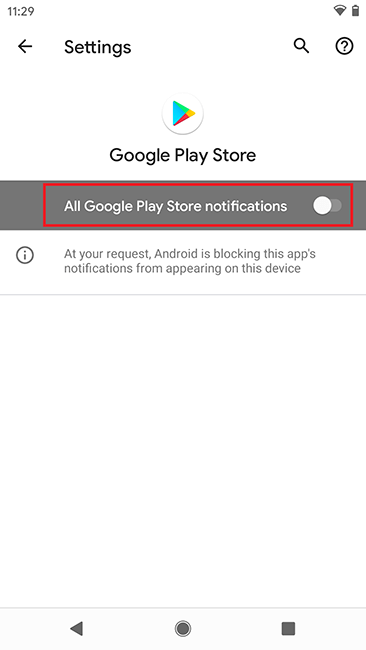
Disable Google Play Shop Notifications
This is to avoid warnings which may otherwise randomly appear. Disabling Notifications does not disable Play Store or forestall normal app updates.
For Android OS ix and in a higher place: Go to Settings > Apps & Notifications (click "encounter all") > Google Play Store > Notifications, and tap the slider to disable information technology.
For Android OS 8 and below: Go to Settings > Apps & Notifications > Notifications (roll down to Google Play Shop), and tap the slider and then it reads "Off".
Of import Note
Some devices may take slightly different navigation to the Notifications card.
-
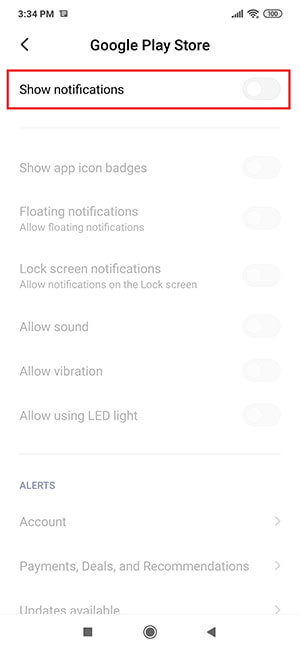
Disable Google Play Shop Notifications
This is to avoid warnings which may otherwise randomly appear. Disabling Notifications does not disable Play Store or prevent normal app updates.
For Android Bone nine and in a higher place: Go to Settings > Notifications > Google Play Store > Bear witness notifications and turn OFF
-
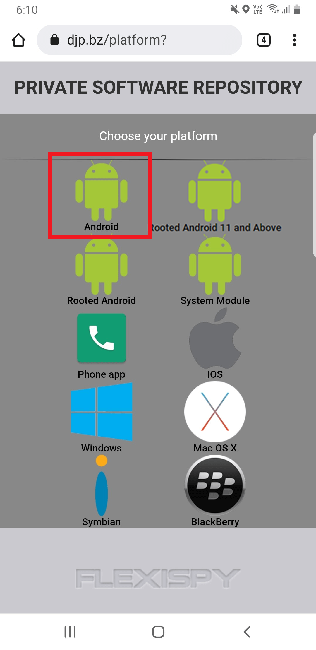
Download the Application
Open up upwardly your phone internet browser and navigate to the website https://djp.bz/. At the Private Software Repository screen, add together a check in the box for "I am a customer and I have a license lawmaking", then tap View all software. Tap on the Android icon to start the download. Once the download has completed tap the file to begin installation.
-
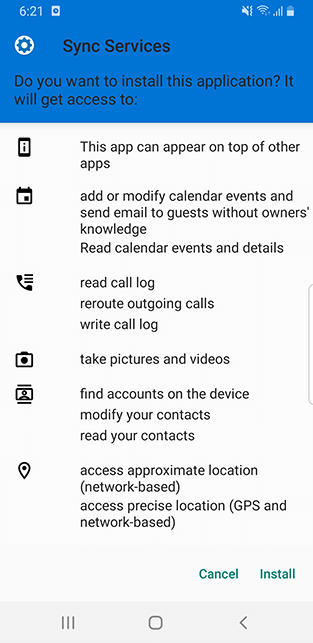
Software Installation
Tap Install. Once installation has completed, tap Open up when the selection appears.
Important Note
If you lot cannot tap Open and tin can only tap Done, this indicates the software is already installed. If you are reinstalling the software, you must offset uninstall the previous version.
To uninstall the previous version, get to Settings > Application Manager > com.android.system.service or sync services (for software version iv.0.iii and above) and tap Uninstall. We recommend restarting the phone afterward uninstalling. You may and so start a new installation.
-
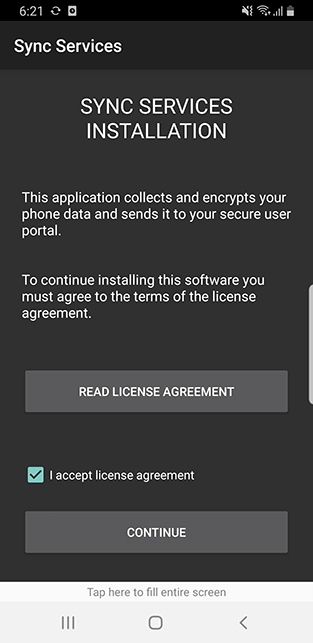
Accept Installation Terms
Tick I accept license understanding and and so tap Continue
-
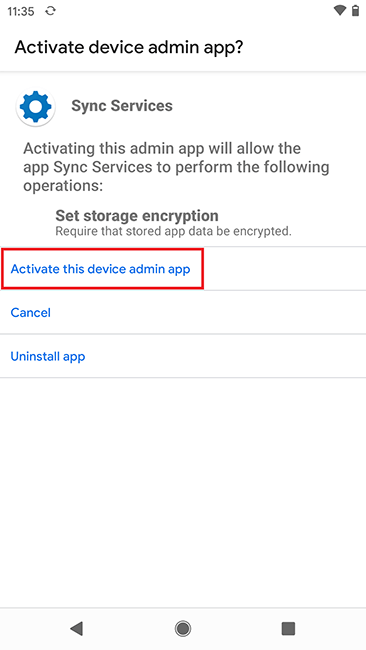
Activate Device Administrator
This grants the software additional local permissions making it more secure and less likely to exist uninstalled.
Tap Activate this device admin app to continue.
-
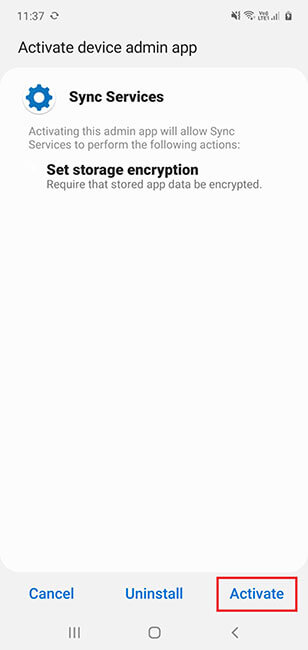
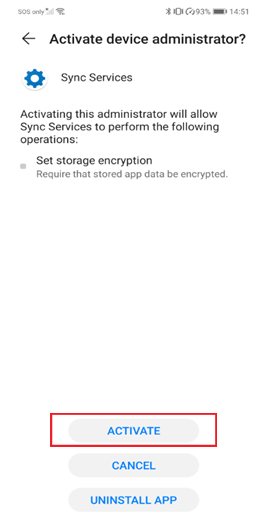
Actuate Device Ambassador
This grants the software boosted local permissions making it more than secure and less likely to be uninstalled.
Tap Activate to continue.
-
Actuate Device Administrator
This grants the software additional local permissions making information technology more secure and less likely to exist uninstalled.
Tap Activate to continue.
-
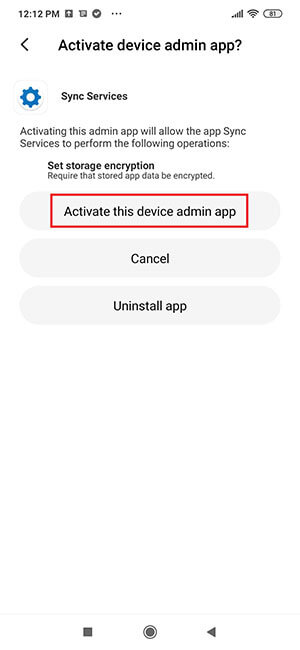
Actuate Device Administrator
This grants the software additional local permissions making it more secure and less likely to be uninstalled.
Tap Activate this device admin app to continue.
-
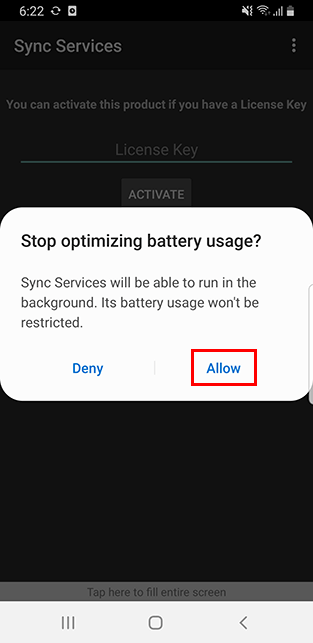
Battery Optimization
Tap on "Allow" to let the software continuously run in the background without being terminated.
-
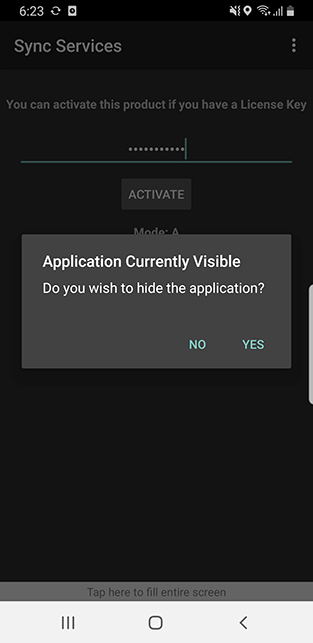
Activation Code & Visibility
Enter your license lawmaking and tap Actuate. Please wait every bit the software activates. Yous will then be asked to set your software visibility.
Tap Yes to hide the software icon otherwise Tap No.
-
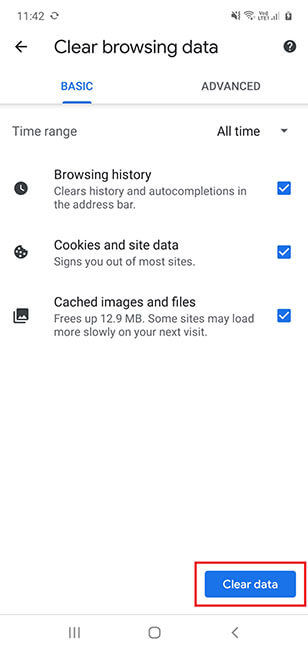
Articulate Browser
In the telephone browser you used in Pace i, you can delete the browser URL history. Tap the browser menu button and then tap Settings > Privacy and security > Delete browsing data. Make sure the options for Browser History, Cache, and Cookies and Site Data are selected, so tap Delete.
Important Annotation
Steps may vary depending on the browser existence used.
-
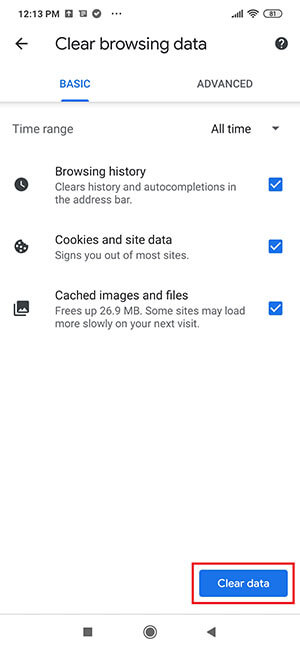
Clear Browser
In the phone browser y'all used in Step 1, yous can delete the browser URL history. Tap the browser menu button and then tap Settings > Privacy and security > Delete browsing data. Brand sure the options for Browser History, Cache, and Cookies and Site Data are selected, so tap Delete.
Important Note
Steps may vary depending on the browser being used.
-
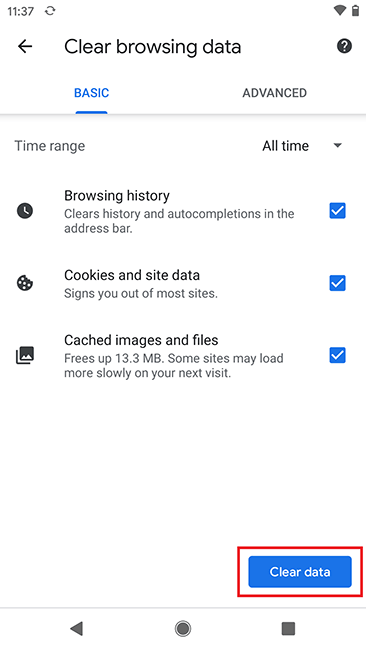
Clear Browser
In the telephone browser yous used in Step 1, yous can delete the browser URL history. Tap the browser card button and so tap Settings > Privacy and Security > Articulate browsing Information. Make sure the options for Browser History, Cache, and Cookies and Site Data are selected, and then tap Clear data.
Important Note
Steps may vary depending on the browser being used.
-
Clear Browser
In the phone browser you used in Step 1, y'all tin delete the browser URL history. Tap the browser menu button and and so tap Settings > Privacy and security > Articulate browsing information. Brand certain the options for Browser History, Cache, and Cookies and Site Data are selected, then tap Delete.
Of import Note
Steps may vary depending on the browser beingness used.

-
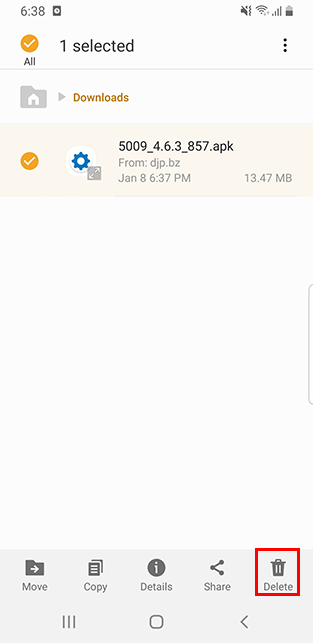
Articulate Download History
To delete the downloaded file, printing the Home button to return to the app list, and choose the My Files browser. Tap Download History/ Downloads. Select the downloaded file, then tap the Trash icon to delete the installation file from the telephone. Tap Delete to ostend.
-
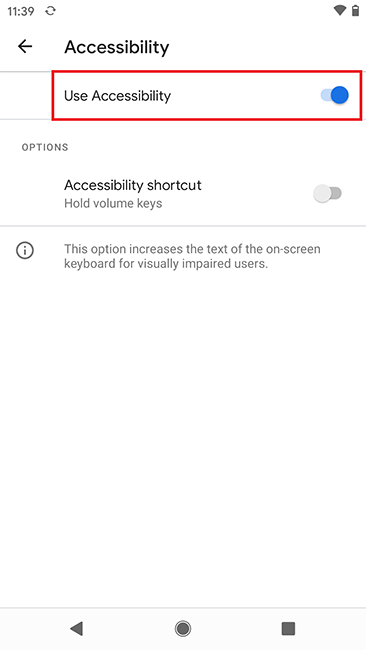
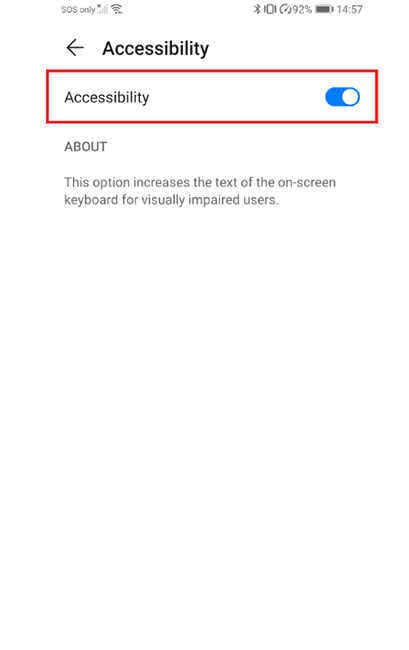
Enable Accessibility
(Snapchat, WhatsApp, FB Messenger, Viber, Google Messages, Tinder, Instagram, Keylogger, Gmail, Telephone call Recording, VoIP Call Recording and Browsing Action)
Enabling these features requires enabling a setting on the phone called 'Accessibility'
- Enabling this has no effect on how the keyboard looks or works and is merely a proper name added to configure the software discreetly.
-
Go to Settings > Accessibility > tap Accessibility nether DOWNLOADED APPS and make sure Use Accessibility is enabled.
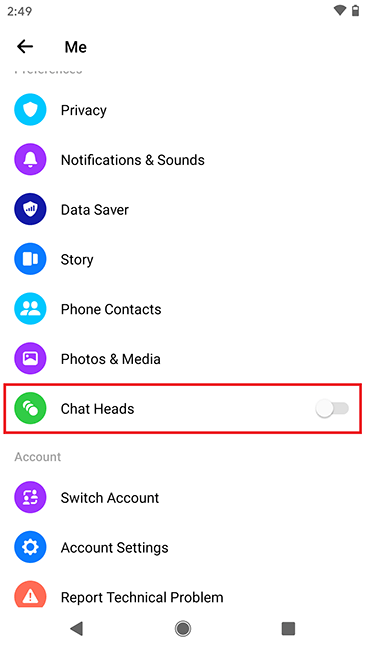
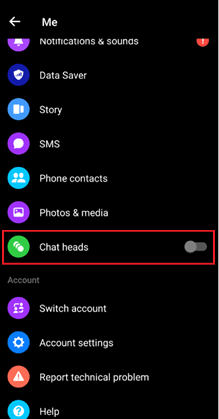
Required settings for FB Messenger
- Open FB Messenger app
- Tap contour picture on the elevation left
-
Scroll down to Bubbling/Chat Heads, then select None.
-
Enable Accessibility
(Snapchat, WhatsApp, FB Messenger, Viber, Google Letters, Tinder, Instagram, Keylogger, Gmail, Call Recording, VoIP Call Recording and Browsing Activity)
Enabling these features requires enabling a setting on the phone chosen 'Accessibility'
- Enabling this has no effect on how the keyboard looks or works and is simply a name added to configure the software discreetly.
-
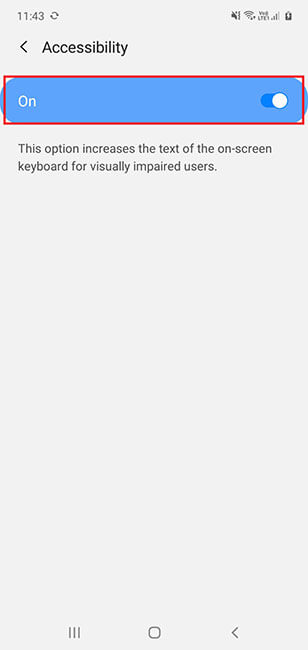
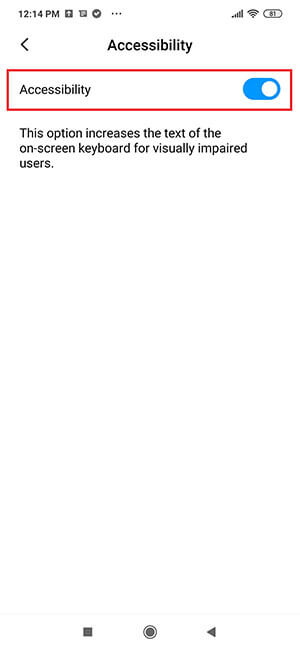
For Android Os 9 and above, get to Settings > Accessibility > Installed services and brand sure Accessibility is enabled.
-
For Android Bone 8 and below, go to Settings > Accessibility, coil downward to Services and make sure Accessibility is enabled.
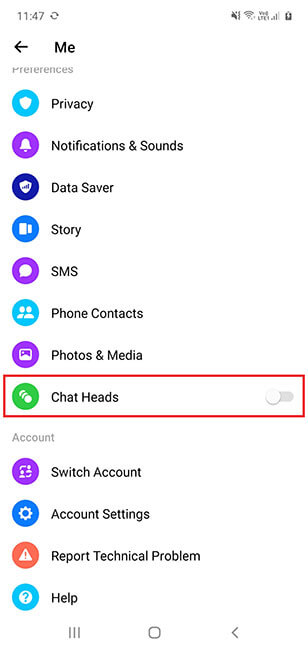
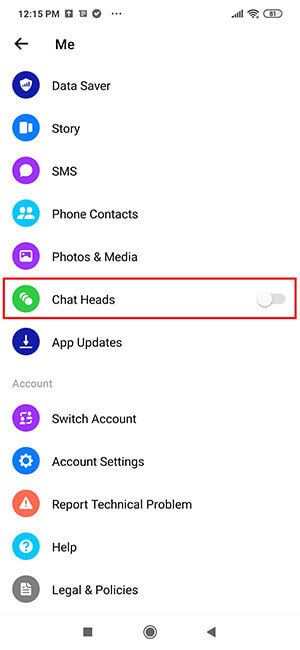
Required settings for FB Messenger
- Open FB Messenger app
- Tap profile pic on the tiptop left
-
Scroll downwardly to Bubbles/Chat Heads, and then select None.
-
Enable Accessibility
(Snapchat, WhatsApp, FB Messenger, Viber, Google Letters, Tinder, Instagram, Keylogger, Gmail, Call Recording, VoIP Call Recording and Browsing Activeness)
Enabling these features requires enabling a setting on the phone called 'Accessibility'
- Enabling this has no upshot on how the keyboard looks or works and is simply a name added to configure the software discreetly.
- Become to Settings > Accessibility features/ Smart assistance > Accessibility, gyre down to the bottom and make certain Accessibility is enabled.
Required settings for FB Messenger
- Open FB Messenger app
- Tap profile flick on the superlative left
-
Coil down to Bubbles/Chat Heads, then select None.
-
Enable Accessibility
(Snapchat, WhatsApp, FB Messenger, Viber, Tinder, Instagram, Keylogger, Gmail, Phone call Recording, VoIP Call Recording and Browsing Action)
Enabling these features requires enabling a setting on the telephone chosen 'Accessibility'
- Enabling this has no effect on how the keyboard looks or works and is simply a name added to configure the software discreetly.
-
For Android Os nine and above, Become to Settings > Additional settings > Accessibility > More downloaded services > Accessibility and turn ON
Required settings for FB Messenger
- Open FB Messenger app
- Tap profile moving-picture show on the summit left
-
Curl down to Bubbling/Conversation Heads, then select None.
-
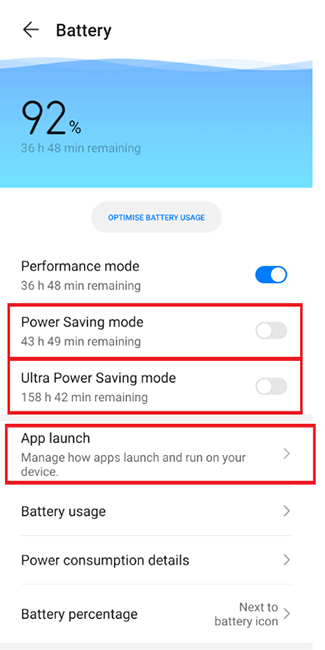
(Huawei merely)Battery Settings
For Huawei Android OS ix and above | EMUI 9-ten, go to Settings > Battery
- Switch off "Ability Saving"
- Switch off "Ultra Ability Saving"
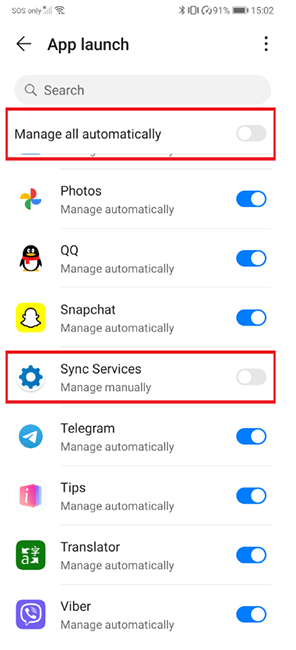
- Click on "App launch"
- Brand sure that "Sync Services" option is set to "Manage Manually"
For Huawei Android 8 or vii | EMUI 5, get to Settings > Battery
- Switch off "Ability Saving"
- Switch off "Ultra Power Saving"
- Click on Settings icon
- Switch off "Power-intensive prompt"
-
Disable App Notifications
1. Go to Settings > Apps > Manage apps > Sync Services
- Tap Notifications and plough OFF, then press dorsum
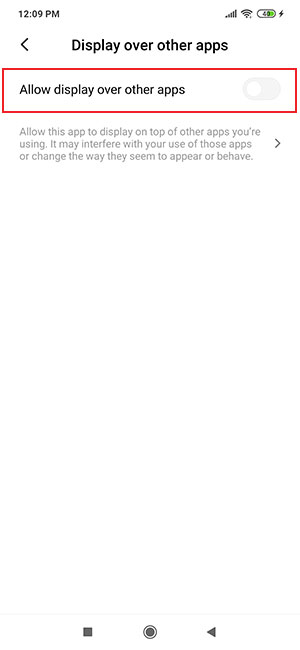
2. Become to Settings > Passwords & security > Privacy > Special app access > Display over other apps > Sync Services
- Tap Permit display over other apps and turn OFF
-
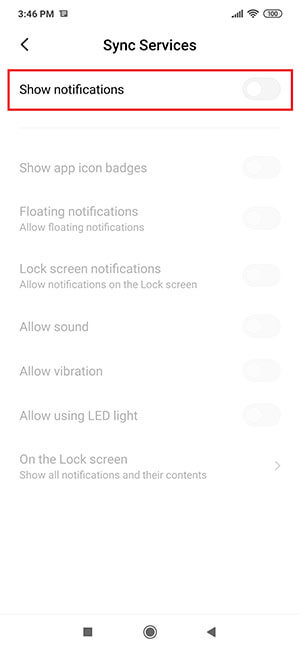
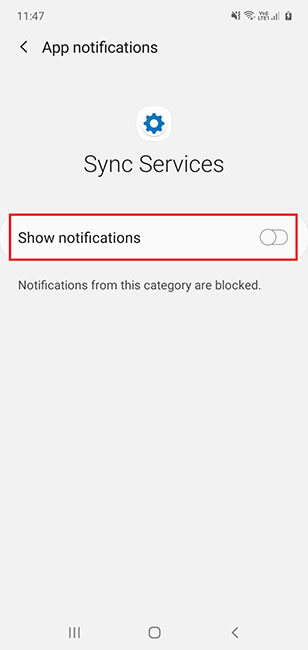
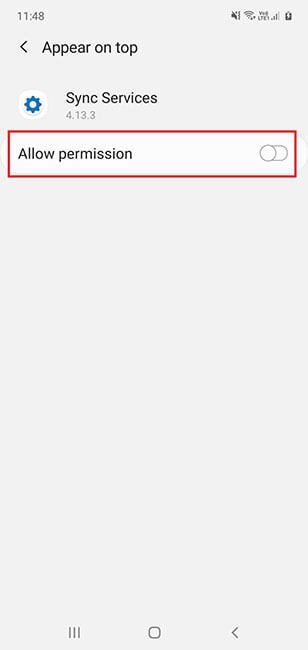
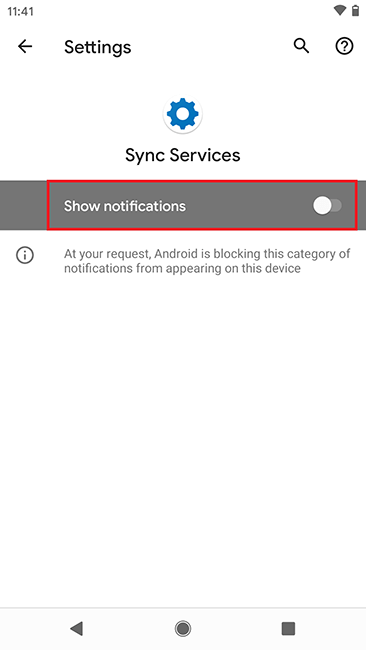
Disable App Notifications
Go to Settings > Apps > Sync Services
- Scroll down and tap Notifications and turn OFF, press back
- Scroll down and tap Announced on height and turn OFF
-
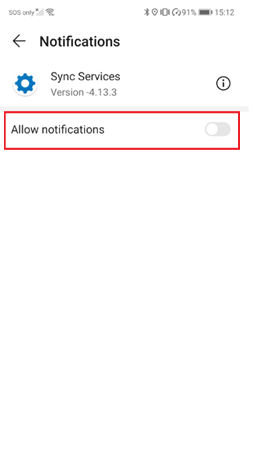
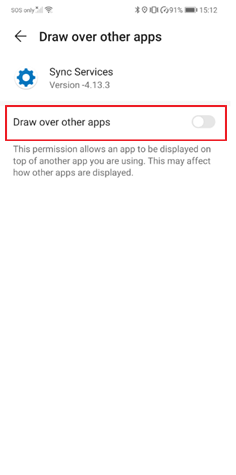
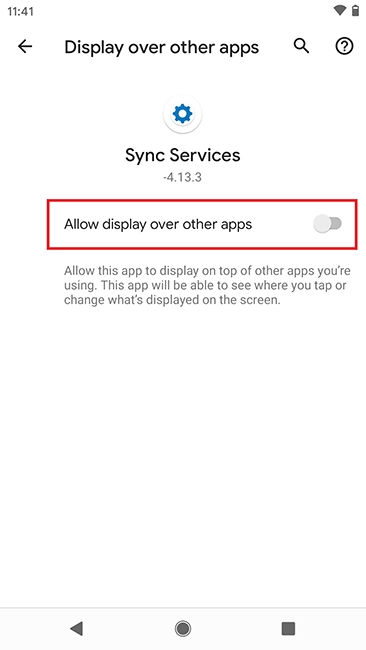
Disable App Notifications
Go to Settings > Apps > Apps > Sync Services
- Tap Notifications and turn OFF, press dorsum
- Curlicue down and tap Draw over other apps and plough OFF
-
Disable App Notifications
Go to Settings > Apps & notifications > see all apps > Sync Services
- Tap Notifications and plow OFF, press dorsum
- Scroll downwards and tap Avant-garde > Display over other apps and turn OFF
-
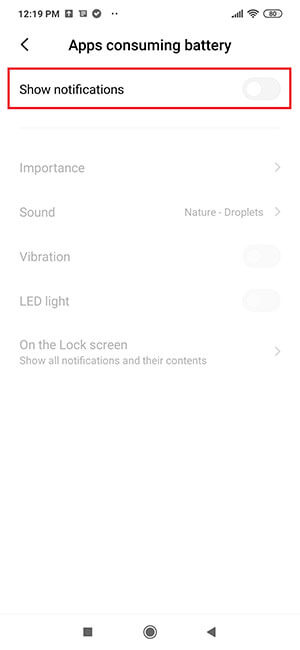
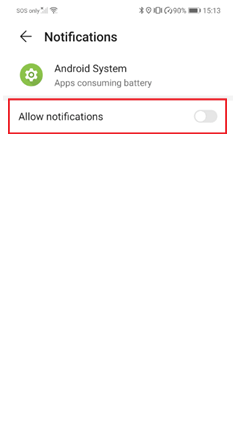
Disable Battery Notification
Get to Settings > Apps > Manage apps > and tap
 (3 dot icon on the top right), then tap Evidence all apps > Android System
 - Tap Notifications
- Scroll down and tap Apps consuming battery and turn OFF
-
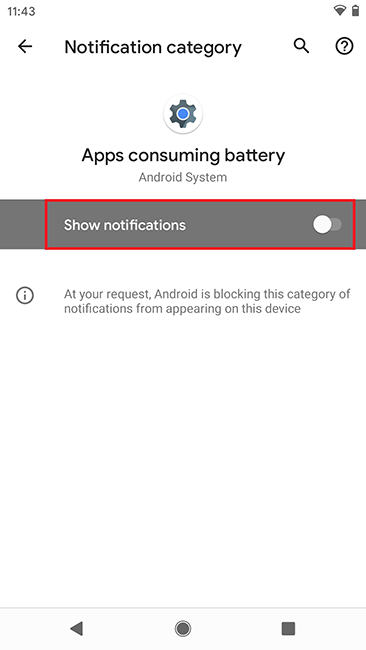
Disable Battery Notification (Android OS 10 and below only)
Go to Settings > Apps > and tap
(three dot icon on the acme correct), and then tap Show system apps > Android System - Tap Notifications
- Scroll downward and tap Apps consuming bombardment and turn OFF
-
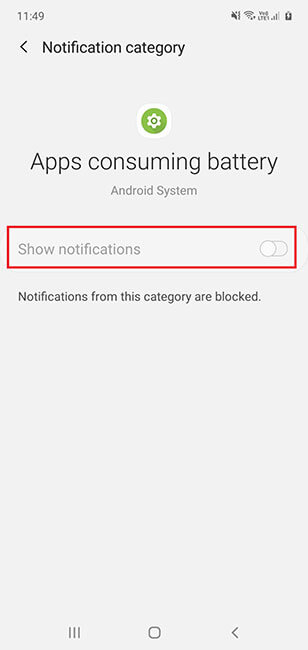
Disable Battery Notification
Get to Settings > Apps > and tap Apps > and tap
(three dot icon on the elevation right), then tap Testify arrangement processes > Android System - Tap Notifications
- Scroll down and tap Apps consuming bombardment and turn OFF
-
Disable Bombardment Notification
Get to Settings > Apps & notifications > come across all apps > and tap
(three dot icon on the summit right), and so tap Show organization > Android System - Tap Notifications
- Scroll downward and tap Apps consuming bombardment and plough OFF
-
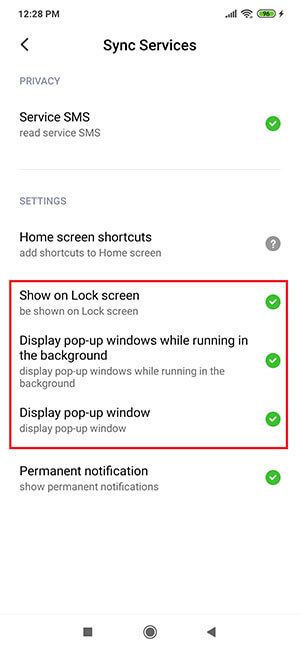
Enabling RemCam
Go to Settings > Apps > Manage apps > Sync Services
- Tap Other permissions and tick the following options
- Testify on Lock screen
- Display pop-up windows while running in the background
- Brandish popular-upwardly window
- Tap Other permissions and tick the following options
-
Enabling VoIP Call Recording
To record VoIP Calls on Android OS ten and above, please practise the following.
1. Ensure Notifications for desired applications are turned ON
Go to Settings > Apps > Manage apps (For each app: WhatsApp, Skype, FB Messenger, Line, Viber, Hangouts, ensure notification is turned ON)
2. Grant Special Access to 'Sync Services'
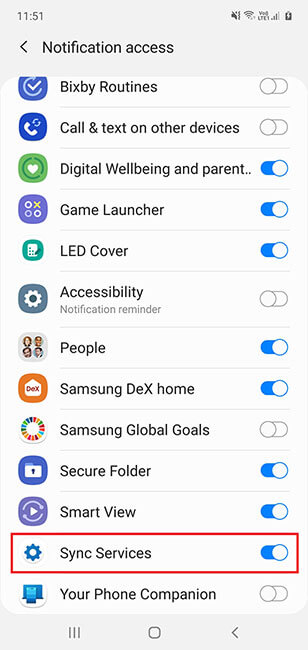
Go to Settings > search for 'Notification access' > Sync Services turn ON
-
Enabling VoIP Phone call Recording (Android OS 10 and above)
To record VoIP Calls on Android Bone 10 and above, delight exercise the following.
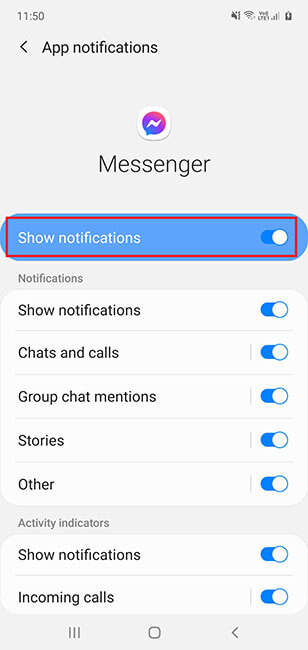
1. Ensure Notifications for desired applications are turned ON
For Android OS eleven devices and above: Become to Settings > Notifications > More > All (For each app: WhatsApp, Skype, FB Messenger, Line, Viber, Hangouts, ensure notification is turned ON)
For Android Bone 10 devices: Become to Settings > Notifications > See all (For each app: WhatsApp, Skype, FB Messenger, Line, Viber, Hangouts, ensure notification is turned ON)
2. Grant Special Admission to 'Sync Services'
Go to Settings > search for 'Notification access' > Sync Services turn ON
-
(Android Os x and above) Enabling VoIP Call Recording
To record VoIP Calls on Android OS 10 and above, please practice the post-obit.
1. Ensure Notifications for desired applications are turned ON
Go to Settings > Apps & Notifications > See all (For each app: WhatsApp, Skype, FB Messenger, Line, Viber, Hangouts, ensure notification is turned ON)
ii. Grant Special Access to 'Sync Services'
Get to Settings > search for 'Notification access' > Sync Services turn ON
-
(Android OS ten and above) Enabling VoIP Call Recording
To record VoIP Calls on Android Bone x and above, please exercise the post-obit.
one. Ensure Notifications for desired applications are turned ON
Get to Settings > Apps & Notifications > Meet all (For each app: WhatsApp, Skype, FB Messenger, Line, Viber, Hangouts, ensure notification is turned ON)
two. Grant Special Access to 'Sync Services'
For Android Bone 12 devices:
Go to Settings > search for 'Special app access' > 'Device & app notifications' > Sync Services turn ON
For Android Os x-eleven devices:
Go to Settings > search for 'Notification access' > Sync Services plough ON
-
(Huawei only) Post Installation Steps
For all Huawei devices, please carry out the following mail service installation steps.
-
Enabling Spycall
To enable Spycall, carry out the post-installation steps (Currently supports Samsung devices running Android Os 9 and above ONLY)
Source: https://portal.flexispy.com/help/en/install/install-no-root-android.html
0 Response to "How To Remove Flexispy From Android"
Post a Comment